Hey guys 🤚, Glad to have you here.
In the previous post, we covered the Part 2 of this series about building a complete Fullstack app called FoxNews using Amazon Web Services. The Part 1 was focused on setting our tools and host the basic setup of our Next.js app on Amazon Amplify using Amplify Framework.
In this post, we will be able to fetch and displays news from remote API called NewsCatcherAPI. Since we have a limited plan (Trial Plan with 1000 request) at https://newscatcherapi.com/, we don't want to exhaust our plan. That's why we are going to to fetch news once when the user open the app and then store the result in a kind of local database for all future actions when user brows the app. to do so, we are going to use Redux with Redux toolkit. The main purpose of this part will be :
- setup redux with redux toolkit
- deploy the result on Amazon Amplify
1. Put everything in place
As we are using existing project, we just need to clone the project at the stage we left in our previous post where we hosted the basic version of our Next.js App with the main and the detail page. To do so, we need to run this in the terminal
git clone -b feat/part2-ui-layer --single-branch https://github.com/Doha26/Foxnews-nextjs-aws.gitWith this, you fetch all the branches in the repository, checkout to the one you specified, and the specific branch becomes the configured local branch for git push and git pull The --single-branch flag (introduced in Git version 1.7.10) allows you to only fetch files from the specified branch without fetching other branches
Go tot the root of the project with cd foxnews-nextjs-aws and yarn
Create a new branch to track all the changes we will make during this Part 2. To do so, run this inside the terminal.
git checkout -b feat/part3-reduxto create a new branch calledfeat/part3-reduxgit push --set-upstream origin feat/part3-reduxpush everything on github to start- run yarn dev to serve the default setup at
localhost:3000that looks like this

Well 👏, if you have this, it's means we are ready for the next step. Let's go 🏄🏼♂️
In the previous post, we hardcoded the displayed news in the code in the src/utils file. In this post, we are going to refacto this and fetch news from the remote newscacther API. Let's start.
2. Get an API Key
Go to newsCatcherAPI website here and on the top menu, got to Get API Key.

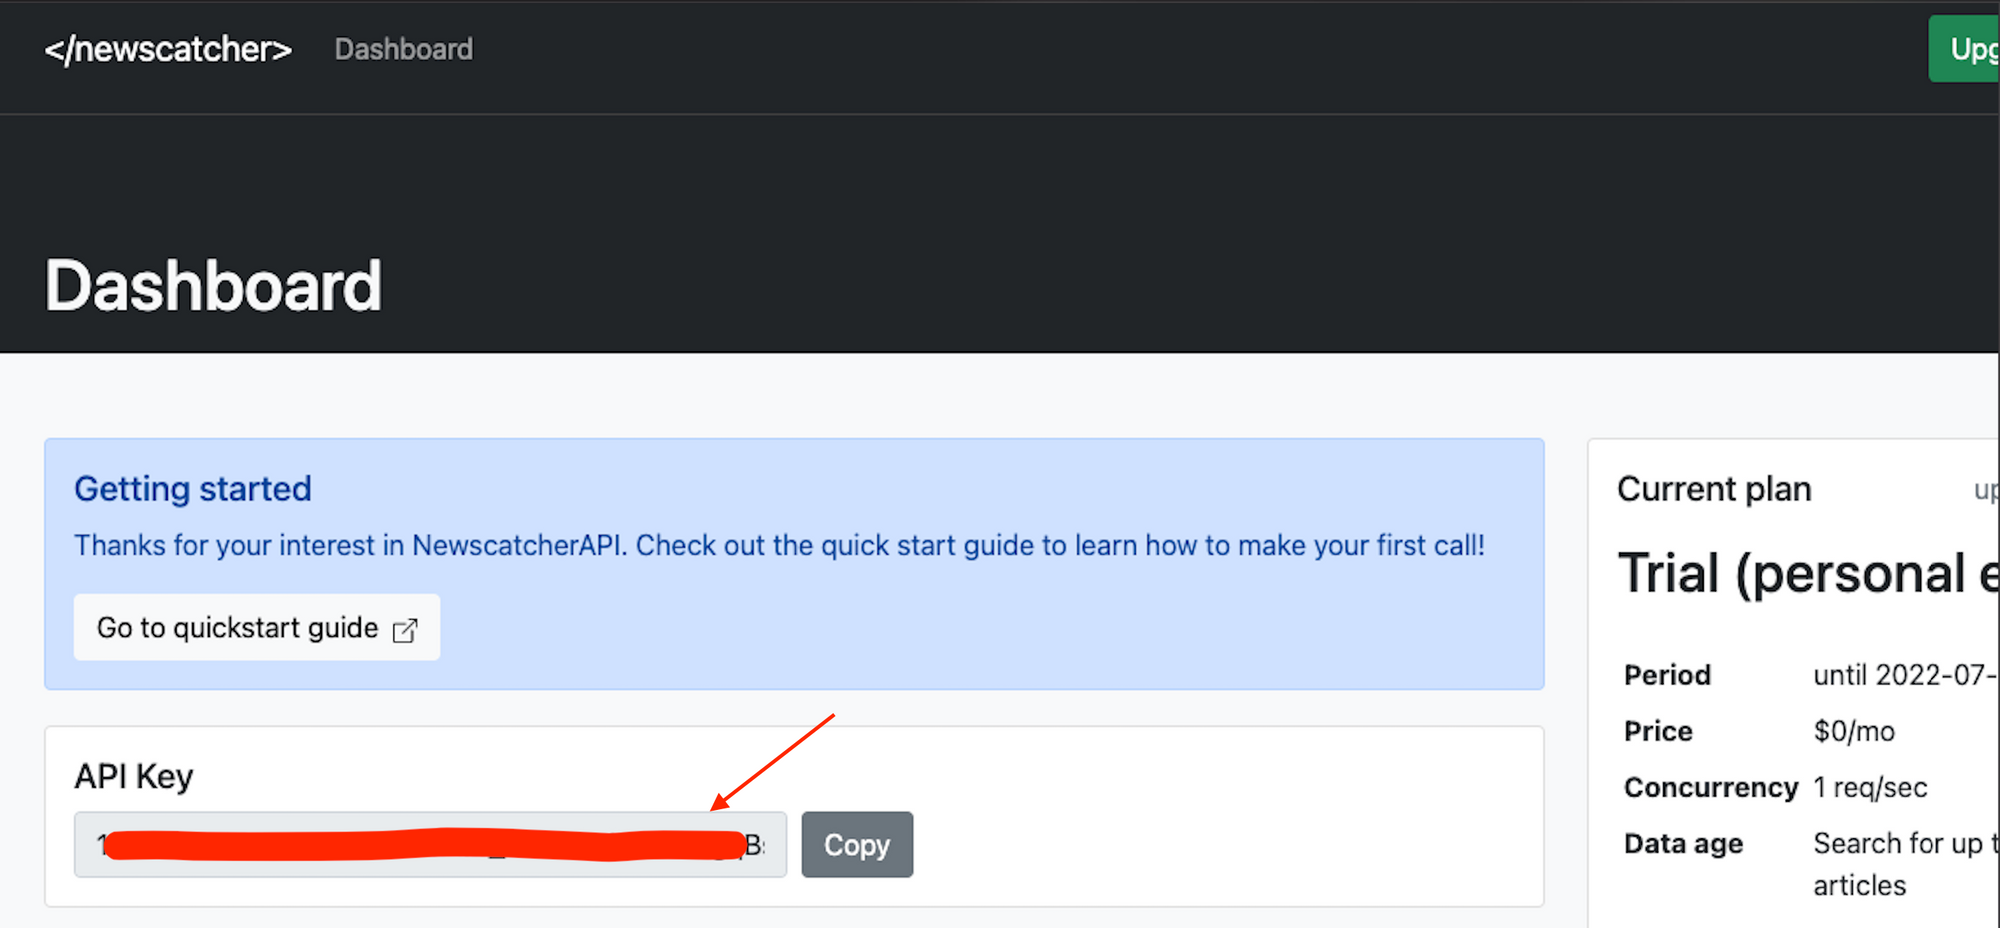
you will be asked to register and choose a plan. You can choose the free plan that is absolutely good for our use case. Once Done, you will have access to the dashboard and here you will se your API key displayed.

now you have an API Key, create a file named .env.local that will host environment variables. Next.js comes with built-in support for environment variables, which allows you to do the following:
- Use
.env.localto load environment variables - Expose environment variables to the browser by prefixing with
NEXT_PUBLIC_
So inside .env.local add the following
NEXT_PUBLIC_NEWS_API_KEY=XXXXX_YOUR_API_KEY_XXXXXXThis, done, make sure this file is not tracked by git. check the .gitignore and if not present, add it manually.
2. Fetch News with your API Key
we are going to create a utils function to fetch news using the API Key. Inside the lib folder at the root of the project, create a file named getNews.ts and add the following:
const getNews = async (url: string) => {
  const response = await fetch(url, {
    method: 'GET',
    headers: {
      'Content-Type': 'aplication/json',
      'x-api-key': process.env.NEXT_PUBLIC_NEWS_API_KEY || ''
    }
  })
  const data = await response.json()
  return data
}

export default getNews
Note the line 6 with this 'x-api-key': process.env.NEXT_PUBLIC_NEWS_API_KEY || ''. This line set an Http header with the Newscatcher API Key. Without this key, you will not be able to get results from the remote API.
2. Setup Redux and Redux toolkit
before we start explaining how to setup Redux, we will take some lines to explain what is behind the tool and when it can be useful to use.
What is Redux ?
Redux is a predictable state container for JavaScript apps. As the application grows, it becomes difficult to keep it organized and maintain data flow. Redux solves this problem by managing application’s state with a single global object called Store. Redux fundamental principles help in maintaining consistency throughout your application, which makes debugging and testing easier.
Why Should I Use Redux?
Redux helps you manage "global" state - state that is needed across many parts of your application.
The patterns and tools provided by Redux make it easier to understand when, where, why, and how the state in your application is being updated, and how your application logic will behave when those changes occur. Redux guides you towards writing code that is predictable and testable, which helps give you confidence that your application will work as expected.
When Should I Use Redux?
Redux helps you deal with shared state management, but like any tool, it has tradeoffs. There are more concepts to learn, and more code to write. It also adds some indirection to your code, and asks you to follow certain restrictions. It's a trade-off between short term and long term productivity.
Redux is more useful when:
- You have large amounts of application state that are needed in many places in the app
- The app state is updated frequently over time
- The logic to update that state may be complex
- The app has a medium or large-sized codebase, and might be worked on by many people
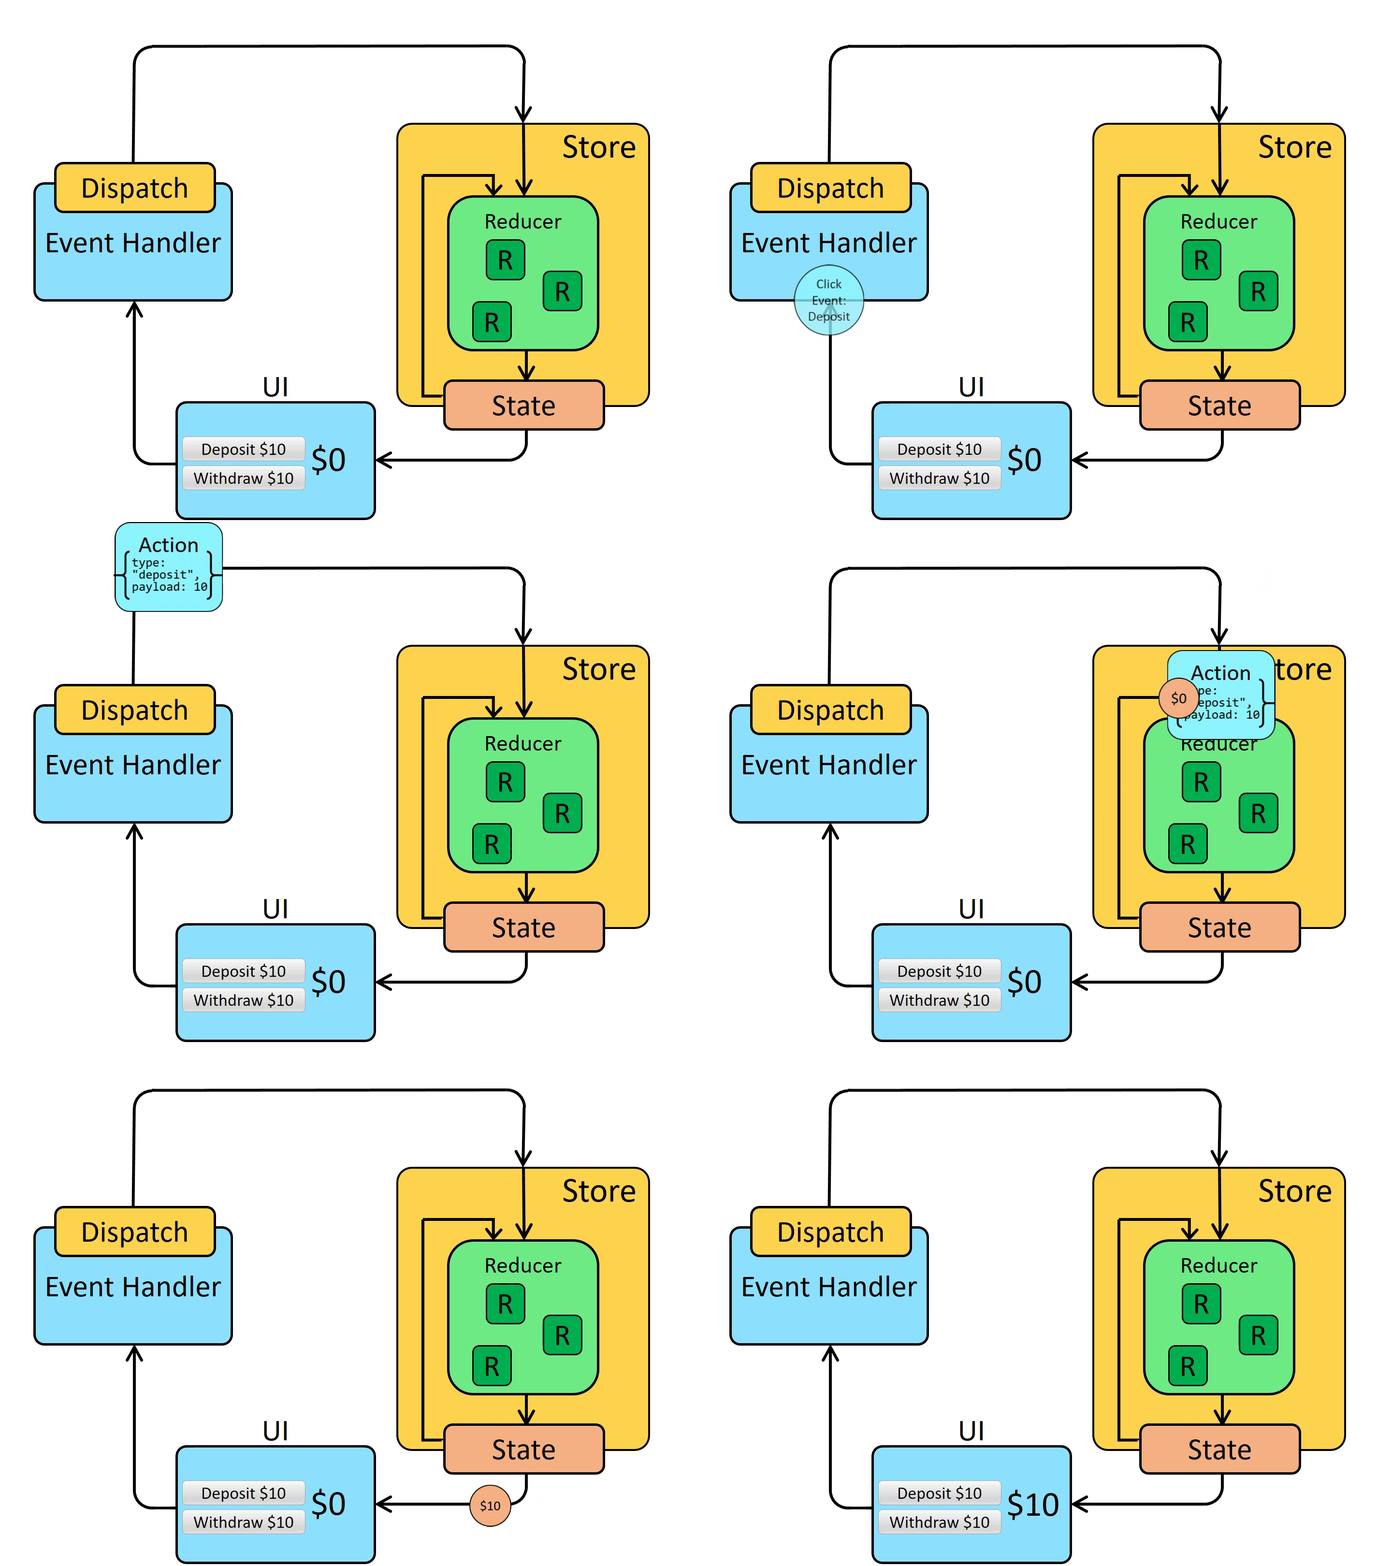
The following image from redux documentation let you understand the redux flow

You can read more at the Redux documentation here https://redux.js.org/tutorials/fundamentals/part-1-overview
Redux toolkit
According to the Redux team, Redux Toolkit was created to address three major concerns:
- "Configuring a Redux store is too complicated"
- "I have to add a lot of packages to get Redux to do anything useful"
- "Redux requires too much boilerplate code"
Simply, Redux Toolkit provides us with tools that help abstract over the setup process that used to be troublesome.
Some of functions that simplify the different parts of Redux are :
- configureStore : to simplify store creation
- createAction : to create actions easily
- createReducer : to simplify reducers creation
ReduxToolkit also provide us with another way to combine createAction and createReducer in a single call using Slice with createSlice() function. Let's see all this in action. to start, we need to install required packages. Open your favorite terminal and run the followings.
yarn add @reduxjs/toolkit next-redux-wrapper react-redux redux-persist create a slice file under src/stores/slice/articleSlice.ts
import { createAsyncThunk, createSlice, Draft, PayloadAction } from '@reduxjs/toolkit'
import type { RootState } from '../store'
import { NewsAPIObject, NEWS_API_URL } from '../../utils'
import { HYDRATE } from 'next-redux-wrapper'
import getNews from '../../../lib/getNews'

// declaring the types for our state
export type NewsState = {
  articles: NewsAPIObject[]
  pending: boolean
  error: boolean
  fetched: boolean
  error_code: string
}

const initialState: NewsState = {
  articles: [],
  pending: false,
  error: false,
  fetched: false,
  error_code: ''
}

// Get NEWS from NewsCatcherAPI
export const getArticles = createAsyncThunk('getAticles', async (_, { rejectWithValue }) => {
  const { status, articles, error_code } = await getNews(`${NEWS_API_URL}News`)
  return status === 'ok' ? { error: null, articles } : rejectWithValue({ articles: [], error_code })
})

// HeadersWithoutKey
export const articlesSlice = createSlice({
  name: 'news',
  initialState,
  reducers: {
    setArticles: (state: Draft<typeof initialState>, action: PayloadAction<NewsAPIObject[]>) => {
      state.articles = action.payload
    }
  },
  extraReducers: builder => {
    builder
      .addCase(HYDRATE, (_state: Draft<typeof initialState>) => {
        console.log('HYDRATE', _state)
      })
      .addCase(getArticles.fulfilled, (state, { payload }) => {
        console.log('FULFILLED')
        state.pending = false
        state.articles = payload.articles
        state.fetched = true
      })
      .addCase(getArticles.pending, state => {
        console.log('PENDING')
        state.pending = true
        state.fetched = false
      })
      .addCase(getArticles.rejected, (state, { payload }) => {
        console.log('rejected')
        state.pending = false
        state.error = true
        state.fetched = false
        //@ts-ignore
        state.error_code = payload.error_code
      })
  }
})
// Here we are just exporting the actions from this slice, so that we can call them anywhere in our app.
export const { setArticles } = articlesSlice.actions

// calling the above actions would be useless if we could not access the data in the state. So, we use something called a selector which allows us to select a value from the state.
export const selectArticles = (state: RootState) => state?.news || initialState

// exporting the reducer here, as we need to add this to the store
export default articlesSlice.reducer
With all this installed, let's create a redux store. Under src/store/store.ts
import { Action, combineReducers, configureStore, createStore, ThunkAction, applyMiddleware } from '@reduxjs/toolkit';
import { createWrapper } from 'next-redux-wrapper'
import storage from 'redux-persist/lib/storage'
import { persistReducer, persistStore } from 'redux-persist'
import newsReducer from './slice/articleSlice'

//@ts-ignore
const makeConfiguredStore = reducer => createStore(reducer, undefined, applyMiddleware())

const reducers = combineReducers({
  news: newsReducer
})

const persistConfig = {
  key: 'foxnews',
  whitelist: ['news'],
  storage
}
const persistedReducer = persistReducer(persistConfig, reducers)

const makeStore = () => {
  let store
  const isServer = typeof window === 'undefined'
  if (isServer) {
    store = makeConfiguredStore(newsReducer)
  } else {
    store = configureStore({
      reducer: persistedReducer,
      middleware: getDefaultMiddleware =>
        getDefaultMiddleware({
          serializableCheck: false
        }),
      devTools: true
    })
    //@ts-ignore
    store.__persistor = persistStore(store)
  }
  return store
}

export type AppDispatch = ReturnType<typeof makeStore>['dispatch']
export type AppStore = ReturnType<typeof makeStore>
export type RootState = ReturnType<AppStore['getState']>
export type AppThunk<ReturnType = void> = ThunkAction<ReturnType, RootState, unknown, Action<string>>
export const wrapper = createWrapper<AppStore>(makeStore, { debug: true })
NB: You can see that we create a persistable store using redux-persist. This way, we will fetch data once and then persist to the localStorage and prevent our App to fetch everytime the user refresh the browser.
Now we have a Slice and the store, let's create our customs Hooks that override the default behavior of two Redux function. useDispatch() and useSelector()
under src/store create a file named hooks.ts with the following
import { TypedUseSelectorHook, useDispatch, useSelector } from 'react-redux'
import type { AppDispatch, RootState } from './store'

export const useAppDispatch = () => useDispatch<AppDispatch>()
export const useAppSelector: TypedUseSelectorHook<RootState> = useSelector
With all this set, we now just have to wrap our main _app.tsx component logic inside a component provided by redux-persist and provide the component with our created store. Open _app.tsx at the root and add the following :
import '../../styles/globals.css'
import type { AppProps } from 'next/app'
import { wrapper } from '../store/store'
import { PersistGate } from 'redux-persist/integration/react'
import { useStore } from 'react-redux'
function MyApp({ Component, pageProps }: AppProps) {
  const store = useStore()

  return (
    /*
    // @ts-ignore */
    <PersistGate persistor={store.__persistor} loading={null}>
      <Component {...pageProps} />
    </PersistGate>
  )
}

export default wrapper.withRedux(MyApp)
With this set, we are good to go with redux. let's update our pages components to see it in action.
Update src/pages/index.tsx and add some logic.
...
import { useAppDispatch, useAppSelector } from '../store/hooks'
import { getArticles, selectArticles } from '../store/slice/articleSlice'
...

const Home: NextPage = () => {
    const dispatch = useAppDispatch()
  const { articles, error, error_code } = useAppSelector(selectArticles)
  ..

  useEffect(() => {
    //@ts-ignore
    dispatch(getArticles())
    setMessageTitle('Loading...')
    if (error || articles.length == 0) {
      if (error_code === 'HeadersWithoutKey') {
        setMessageTitle('No API key provided to fetch News 🧩 ')
      } else if (error_code === 'ConcurrencyViolation' && articles.length == 0) {
        setMessageTitle('API Error Wait and then refresh ⛳️')
      } else {
        setMessageTitle('Latest updates')
      }
    } else {
      setMessageTitle('Latest updates')
    }
  }, [articles, dispatch, error_code, error])


   return (
   <div className="flex flex-col scrollbar-hide md:scrollbar-default">

      ..
      ..

       {error && (
        <div className="flex font-mono font-bold text-md mx-auto w-10/12 justify-center mt-36"> {messageTitle}</div>
      )}
      <Footer />
   </div>
   )
}
export default Home
Let's do the same for article details:
...
import { useAppSelector } from '../../store/hooks'
import { selectArticles } from '../../store/slice/articleSlice'
...
// import { fakeNews } from '../../utils' <= REMOVE THIS LINE

const NewsItem = () => {
...
  const { articles } = useAppSelector(selectArticles)
  //const articles = fakeNews <= REMOVE THIS LINE

}
This produce the following result:

We have all the news and the detail page

Now let's fix something we have on the main page. when you scroll, you will see a scrollbar that appear at the right of the screen. let's fix this behavior by hiding the scrollbar with a Tailwind CSS plugin. (Yes i know, it's possible to do this with pure CSS 😆 but let me show you how to do the same with a Tailwind plugin that will work for any browser). On the terminal, run the following to install the plugin:
yarn add tailwind-scrollbar-hideOpen tailwind.config.js at the root of the project and register the plugin
module.exports = {

...

plugins:[require('@tailwindcss/line-clamp'), require('tailwind-scrollbar-hide')]

}
Now update src/pages/index.tsx file with the following
...

const Home: NextPage = () => {

...

return (
	<div className="flex flex-col scrollbar-hide">

    ... .. // Content here

    </div>
)
}

export default Home
And that's all. we always have everything working fine. Push everything on github and merge with the main branch. If the merge is not possible, merge locally by resolving conflicts and then retry.
3. Deploy on Amazon Amplify
On the first part of this tutorials series, we completed how to configure and setup amazon amplify with the project. If you did'nt complete this part, you will not be able to complete this part. make sure to complete the Part 1 with Amplify setup.
To deploy our app to amplify, let's add the NewsCatecherAPI key on Amplify console with the following steps
- Open the Amplify console.
- In the Amplify console, choose App Settings, and then choose Environment variables.
- In the Environment variables section, choose Manage variables.
- In the Manage variables section, under Variable, enter
NEXT_PUBLIC_NEWS_API_KEYkey. For Value, enter the value of your API Key value. By default, Amplify applies the environment variables across all branches, so you don’t have to re-enter variables when you connect a new branch.
Next, configure the project: run amplify configure project
? Which setting do you want to configure? Project information
? Enter a name for the project xxxxxxxxxxxxx // <= project name on amplify console
? Choose your default editor: Visual Studio Code // or your IDE
? Choose the type of app that you're building javascript
Please tell us about your project
? What javascript framework are you using react
? Source Directory Path:  src
? Distribution Directory Path: .next // <= `.next (VERY IMPORTANT)` directory
? Build Command:  npm run-script build
? Start Command: npm run-script start
Using default provider  awscloudformation

Successfully made configuration changes to your project.
NB: Note that for most of the options Amplify should be able to infer the right choice. According to Amplify documentation, some updates are required wether we are deploying SSG Only or SSG + SSR Next.js app. To be more precise, here are the different scenarios:
- SSG Only
Inside package.json
"scripts": {
  "build": "next build && next export",
  ...
}
Run this command.
amplify configure project
Then, keep every thing the way it is, except this:
Distribution Directory Path: out
- SSG & SSR:
Inside package.json
"scripts": {
  "build": "next build",
  ...
}
Run this command.
amplify configure project
Then, keep every thing the way it is, except this:
Distribution Directory Path: .nextIn our case, we are using SSG + SSR so we are going to set the distribution directory path to .next - that's where next export spits out our static files.
Now we just have to publish with the command amplify publish. The amplify CLI with proceed some steps and you prompt a success message once everything done.
✔ Deployment complete!
https://dev.xxxxxx_app_id.amplifyapp.comNB: Another way is to trigger the deploy manually on the Amplify console when everything is pushed on the configured branch (In our case, we configured the main branch on the part 1 ) of your github repository.
We have completed the third Part of this tutorial series 👏
Thanks for reading.
Follow me on socials media to stay up to date with latest posts.


