In a previous post, we have seen how to create a GraphQL server using Node.js, Apollo, and Type-graphql. Now the server is ready to accept queries, we will add a secure layer to avoid our server to handle non-authorized requests.
1. Why is it important to secure 🤨 ?
Servers play a vital role in organizations. Their primary function is to provide both data and computational services. Imagine you build and deploy an app that fetches data, private information, and sensitive user information from your server, and everyone can access these informations only once having your server endpoint? it would be catastrophic for your organization because Security vulnerabilities can lead to the loss of critical data or loss of capability and control that can jeopardize the whole organization. So If you do not secure your servers, then you are treading a dangerous path.
2. What is JWT 🤔 ?
JWT stand for Json Web Token. According to jwt.io (JWT Official website), JSON Web Token (JWT) is an open standard (RFC 7519) that defines a compact and self-contained way for securely transmitting information between parties as a JSON object. This information can be verified and trusted because it is digitally signed. JWTs can be signed using a secret (with the HMAC algorithm) or a public/private key pair using RSA or ECDSA.
Although JWTs can be encrypted to also provide secrecy between parties, we will focus on signed tokens. Signed tokens can verify the integrity of the claims contained within it, while encrypted tokens hide those claims from other parties. When tokens are signed using public/private key pairs, the signature also certifies that only the party holding the private key is the one that signed it.
Here are some scenarios where JSON Web Tokens are useful:
- Authorization: This is the most common scenario for using JWT. Once the user is logged in, each subsequent request will include the JWT, allowing the user to access routes, services, and resources that are permitted with that token. Single Sign On is a feature that widely uses JWT nowadays, because of its small overhead and its ability to be easily used across different domains.
- Information Exchange: JSON Web Tokens are a good way of securely transmitting information between parties. Because JWTs can be signed—for example, using public/private key pairs—you can be sure the senders are who they say they are. Additionally, as the signature is calculated using the header and the payload, you can also verify that the content hasn't been tampered with
In its compact form, JSON Web Tokens consist of three parts separated by dots (.), which are:
- Header: Contains information about the token type and the algorithm used to sign the token (for example, HS256)
- Payload: Contains claims about a particular entity. These statements may have predefined meanings in the JWT specification (known as registered claims) or they can be defined by the JWT user (known as public or private claims)
- Signature: Helps to verify that no information was changed during the token’s transmission by hashing together the token header, its payload, and a secret
Therefore, a JWT will have the pattern xxxxx.yyyyy.zzzzz and will looks like the following
eyJhbGciOiJIUzI1NiIsInR5cCI6IkpXVCJ9.eyJodHRwczovL2Jsb2cuZm91amV1cGF2ZWwuY29tIjp7InJvbGVzIjpbImFkbWluIl0sInBlcm1pc3Npb25zIjpbInJlYWQ6cXVlcnlfc3BlYWNrZXJzIiwicmVhZDpxdWVyeV9zcGVhY2tlciIsInJlYWQ6cXVlcnlfZXZlbnRzIiwicmVhZDpxdWVyeV9ldmVudCIsInJlYWQ6bXV0YXRpb25fbG9naW4iXX0sImlhdCI6MTU4NjkwMDI1MSwiZXhwIjoxNjUxMjc5MTIzLCJzdWIiOiJmYWtlX3N1YmplY3QifQ.nAkH-LoA9g7-iWwJjaV3BpJXG_pB7N6jthhn739INCcThe header section of the above token would decode to:
{
  "alg": "HS256",
  "typ": "JWT"
}
And the payload section would decode as follows:
{
  "https://blog.foujeupavel.com": {
    "roles": [
      "admin"
    ],
    "permissions": [
    "read:query_speackers",
    "read:query_speacker",
    "read:query_events",
    "read:query_event",
    "read:mutation_login"
    ]
  },
  "iat": 1586900251,
  "exp": 1651279123,
  "sub": "fake_subject"
}
For more information, take a look at jwt.io/introduction 😉
3. Setup
In this post, we will implement JWT authorization on a ready-to-use Graphql server we build in my other post. The source code is available here on GitHub. Just clone and run it locally to get started. From your favorite terminal, run the following.
Let's clone the directory containing the initial setup
Since the directory containing the initial setup is part of a repository that hosts multiple tutorials source codes each on a single folder, we will only clone the one with the initial setup we need to get started. Follow the following steps from the terminal.
git clone --no-checkout https://github.com/Doha26/fullstack-hebdo-posts.git

cd fullstack-hebdo-posts

git sparse-checkout init --cone

git sparse-checkout set  03-nodejs-graphql-jwt
And now inside the folder, install node dependencies and start the server
cd 03-nodejs-graphql-jwt && yarn && yarn start:devyou will see the following output

4. Let's implement JWT.
For now, our server just exposes a list of events and speakers of the events and their corresponding locations. Actually, everyone can query the server. Now we will add subscribers and only allow them to query events and speakers.
A subscriber's object can have an ID, email, phone number, password, and address.
So we will have the following:
- A subscriber will log in through a login mutation by providing an email and password
- the server will search among users in a mocked array ready on the server and if there is a user with credentials matching the email/password pair provided by the user, the server will generate a token for the user to query the server and return it back on the login mutation response.
- The user will use this token (if still valid) to query the server and access the list of events and speakers
open src/types.ts and add the following:
@ObjectType({ description: 'Subscriber object' })
export class Subscriber {
  @Field() ID: string
  @Field() name: string
  @Field() phoneNumber: string
  @Field() email: string
  @Field() password: string
  @Field(_type => Location) address: Location
}

@ObjectType({ description: 'Login Response object' })
export class LoginResponse {
  @Field() accessToken: string
  constructor(accessToken: string) {
    this.accessToken = accessToken
  }
}
Inside src/index.ts update loadData() function and add following code to mock Subscribers' data:
// Mock subscribers
  const su1 = new Subscriber()
  su1.ID = '7dd8716b-3fea-46f0-8826-264300557ae2'
  su1.address = l1
  su1.name = 'Jim Coknag'
  su1.email = 'jim.cok@gmail.com'
  su1.password = 'texas90'
  su1.phoneNumber = '+33 6077654543'

  const su2 = new Subscriber()
  su2.ID = '1dce60a4-9761-11ec-b909-0242ac120002'
  su2.address = l2
  su2.email = 'tom.quirk@outlouk.com'
  su2.name = 'Tom QuirkMan'
  su2.password = 'axjkjgdtrfd#400'
  su2.phoneNumber = '+1-202-555-0100'

  const su3 = new Subscriber()
  su3.ID = '9118556a-9761-11ec-b909-8842ac120002'
  su3.address = l3
  su3.name = 'Pavel Foujeu'
  su3.email = 'f.pavel@gmail.com'
  su3.password = '123456FAKE'
  su3.phoneNumber = '+1-202-555-0166'

  // ...
  data.subscribers = [su1, su2, su3]
Inside src/shared.ts add the following variable at the top of the file. This will be the SECRET KEY we will use to sign the JWT token that will be sent to the user. For this post, we will keep it inside the resolver class, but in a real-world scenario, secrets should be kept inside a non-versioned .env file. You can see how to easily manage your .env file in my dedicated post available here.
export const jwtSecretKey = 'KSSLJFLKNDJBNFJBDHBKDJBKBD' // Fake SECRET KEY. To be stored in .env file
Inside src/resolver.ts file, add the following queries for subscribers
 @Query(() => [Subscriber])
  getSubscribers(@Ctx() { db }: AppContext): Subscriber[] | undefined {
    return db.data?.subscribers
  }

  @Query(() => Subscriber)
  getSubscriber(@Arg('id', () => String) id: string, @Ctx() { db }: AppContext): Subscriber | undefined {
    return db.data?.subscribers?.find((subscriber: Subscriber) => subscriber.ID === id)
  }
We need to install jsonwebtoken to sign the token. In the terminal, add the following: yarn add jsonwebtoken @types/jsonwebtoken
 @Mutation(() => LoginResponse, { nullable: true })
  login(
    @Arg('email', () => String) email: string,
    @Arg('password', () => String) password: string,
    @Ctx() { db }: AppContext
  ): LoginResponse | null {
    const user = db.data?.subscribers?.find(
      (subscriber: Subscriber) => subscriber.email === email && subscriber.password === password
    )
    if (user) {
      return new LoginResponse(
        jwt.sign(
          {
            'https://blog.foujeupavel.com': {
              roles: ['admin'],
              permissions: [
                'read:query_speackers',
                'read:query_speacker',
                'read:query_events',
                'read:query_event',
                'read:mutation_login'
              ]
            }
          },
          jwtSecretKey,
          { algorithm: 'HS256', subject: user.ID, expiresIn: '1d' }
        )
      )
    }
    return null
  }
With the server running, open apollo sandbox to test all this.
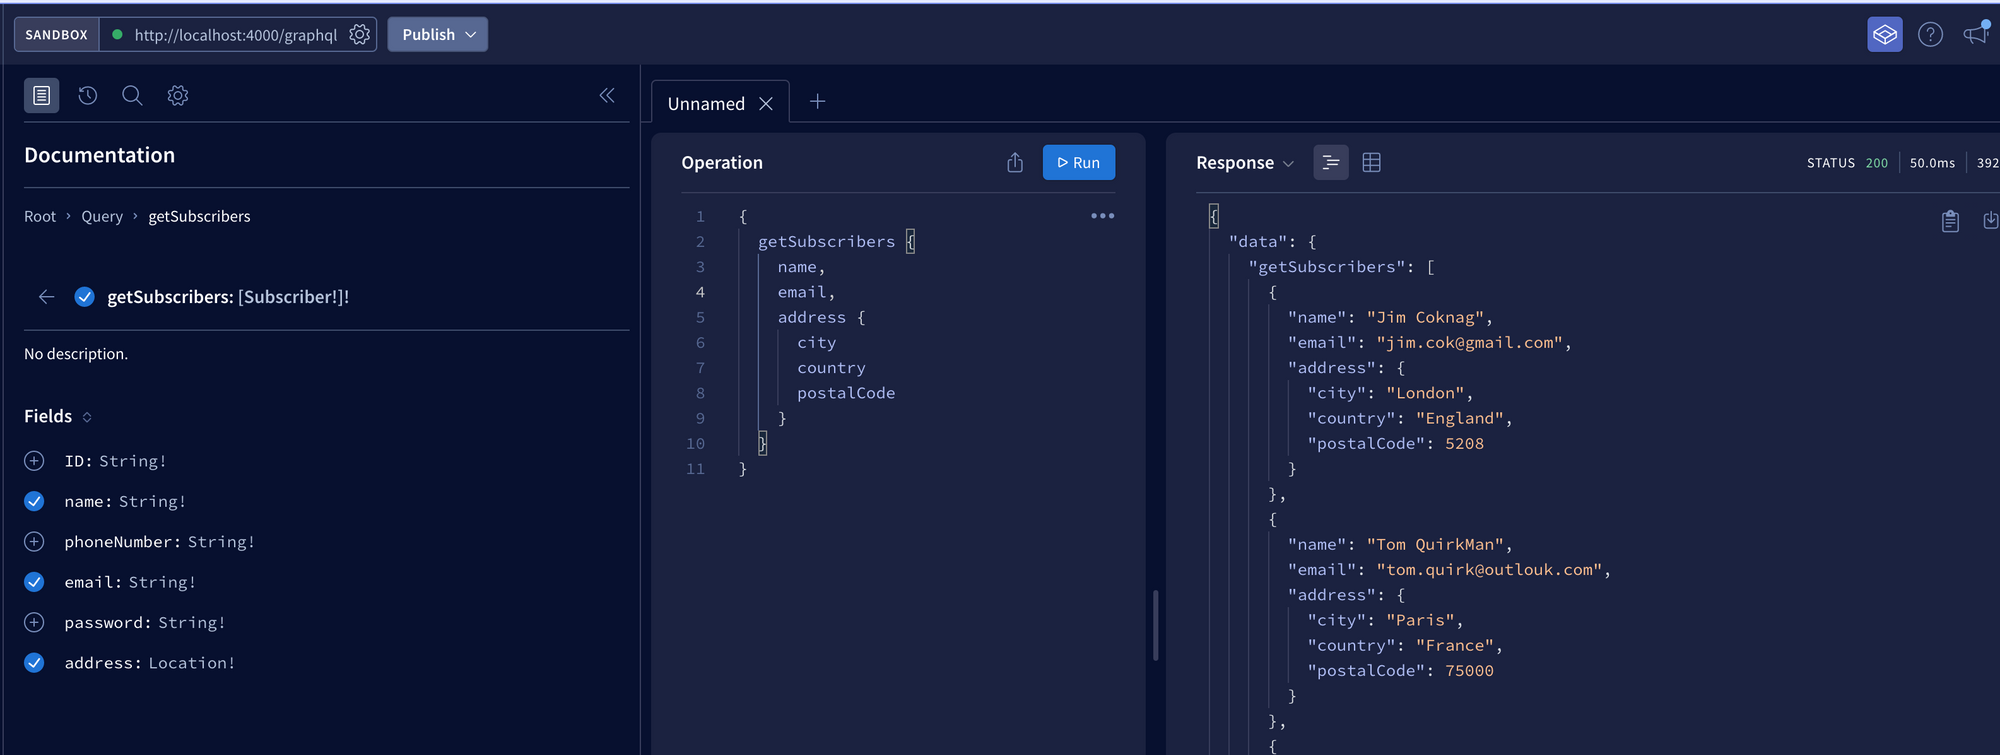
- Get Subscribers

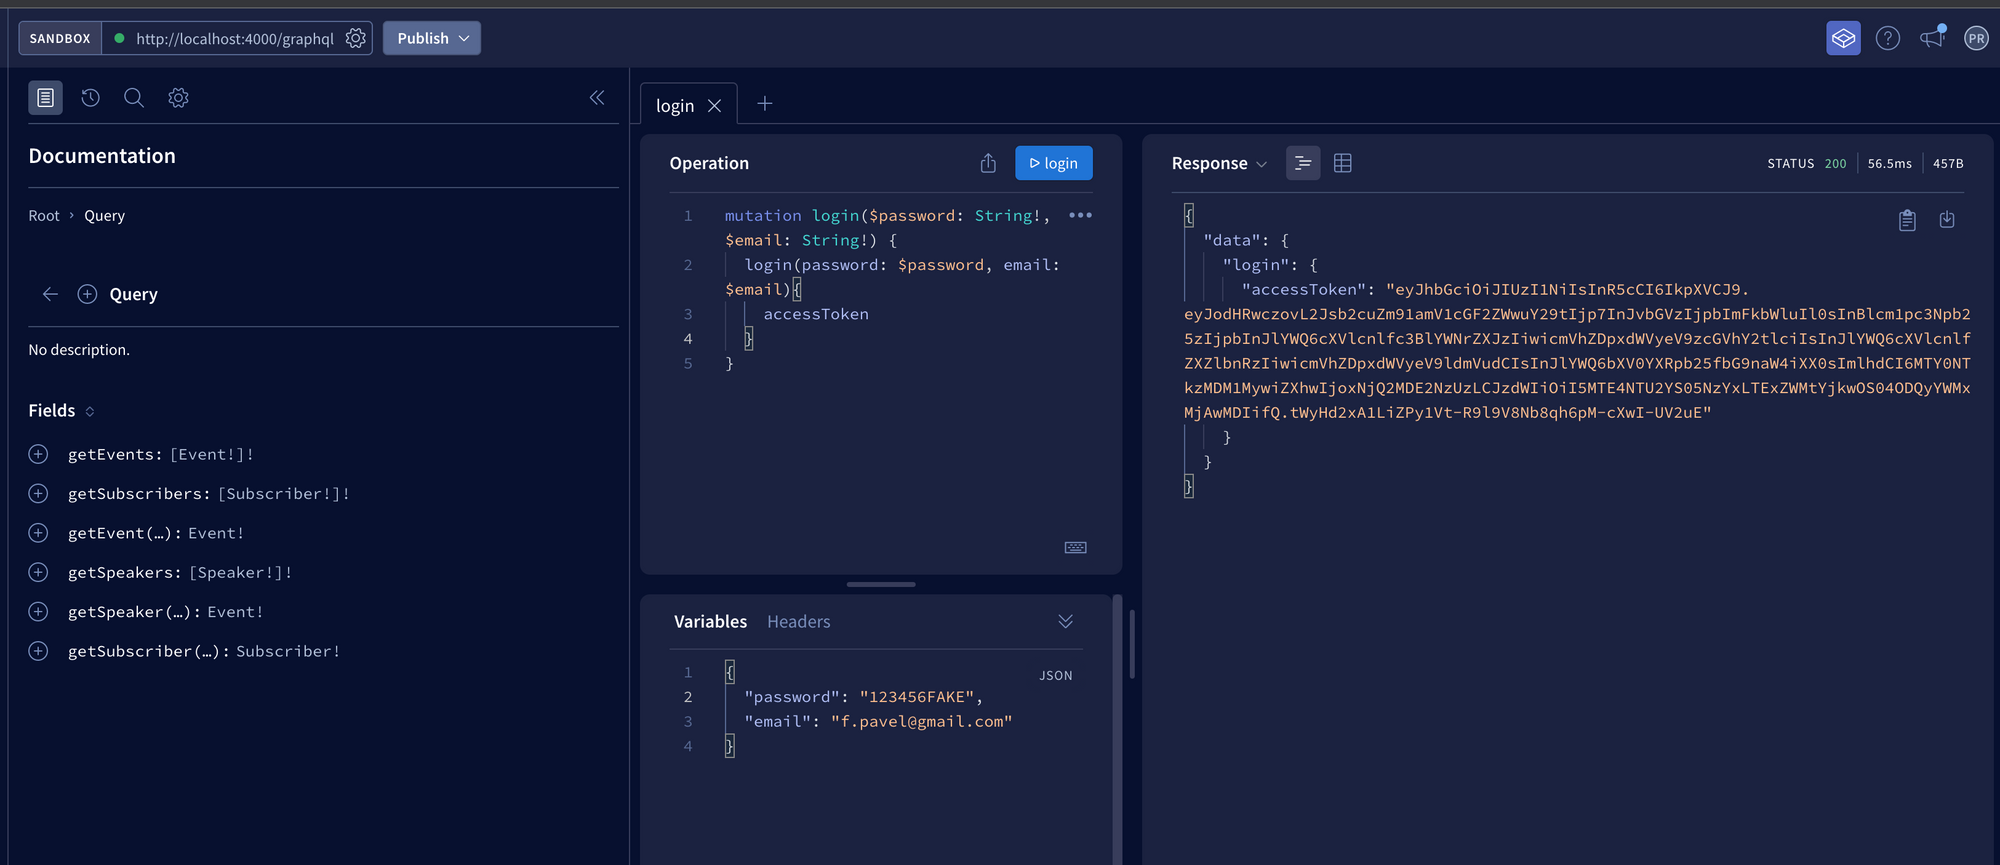
- Login user with email/password

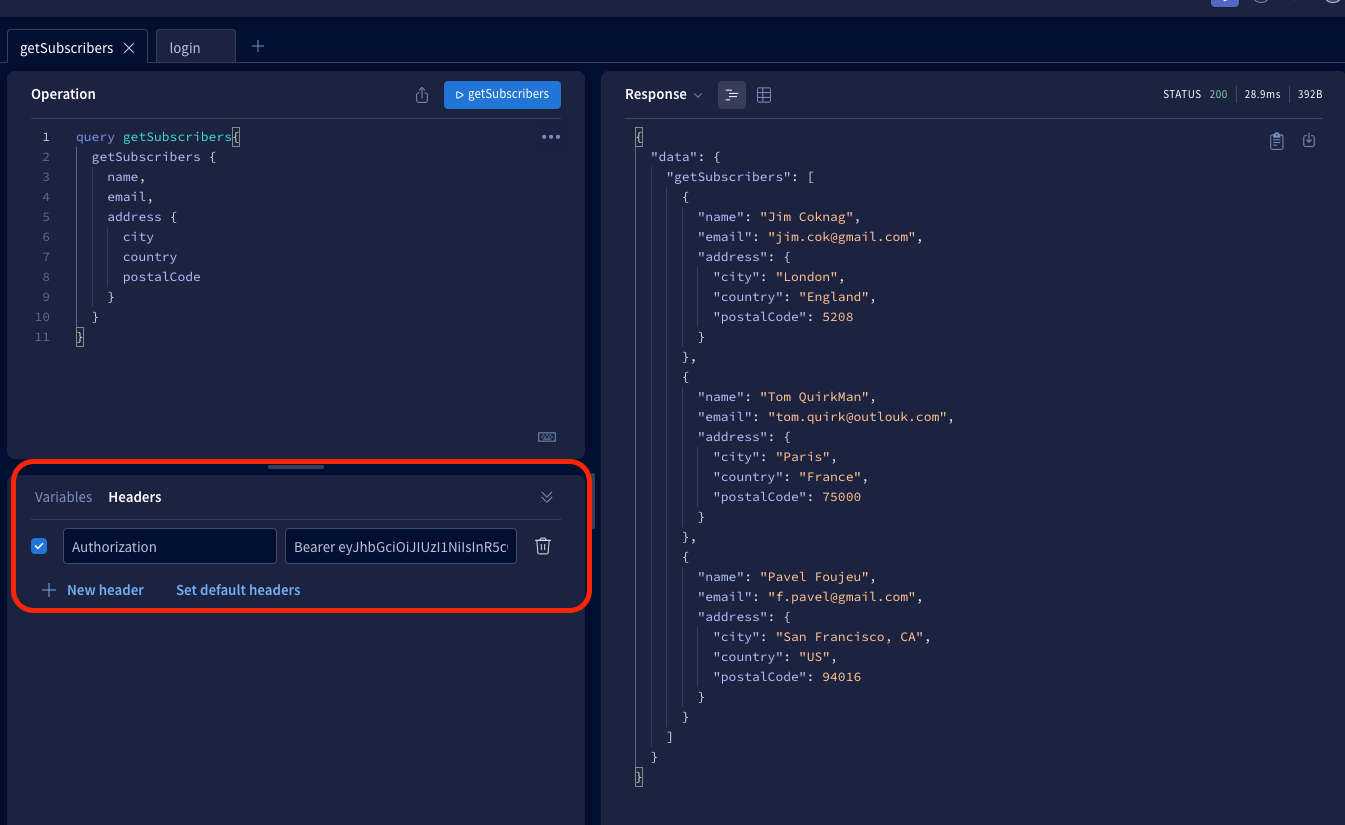
We’ll paste the returned token into the “HTTP Headers” panel of GraphQL Playground as follows:
{
  "Authorization": "Bearer eyJhbGciOiJIUzI1NiIsInR5cCI6IkpXVCJ9.eyJodHRwczovL2Jsb2cuZm91amV1cGF2ZWwuY29tIjp7InJvbGVzIjpbImFkbWluIl0sInBlcm1pc3Npb25zIjpbInJlYWQ6cXVlcnlfc3BlYWNrZXJzIiwicmVhZDpxdWVyeV9zcGVhY2tlciIsInJlYWQ6cXVlcnlfZXZlbnRzIiwicmVhZDpxdWVyeV9ldmVudCIsInJlYWQ6bXV0YXRpb25fbG9naW4iXX0sImlhdCI6MTY0NTkzMDM1MywiZXhwIjoxNjQ2MDE2NzUzLCJzdWIiOiI5MTE4NTU2YS05NzYxLTExZWMtYjkwOS04ODQyYWMxMjAwMDIifQ.tWyHd2xA1LiZPy1Vt-R9l9V8Nb8qh6pM-cXwI-UV2uE"
}
Next, we’ll install Express middleware that verifies and decodes the JWT when it’s sent with requests from GraphQL Playground: yarn add express-jwt
Then we’ll add the middleware to the index.js file, using the same secret that was used to sign the JWT in the mutation, choosing the same signing algorithm, and setting the credentialsRequired option to false so Express won’t throw an error if a JWT hasn’t been included (which would be the case for the initial login mutation or when GraphQL Playground polls for schema updates):
Update src/types.ts and update AppContext type with the following
interface JWTClaim { // NEW
  [key: string]: {
    roles: string[]
    permissions: string[]
  }
}
export type AppContext = {
  req: Request
  res: Response
  db: Low<JsonData>
  user:
    | (JWTClaim & {
        sub: string
        iat: number
        exp: number
      })
    | Express.User
    | null
}
Update src/index.ts and add the following:
//...
import expressJwt from 'express-jwt'
import { jwtSecretKey } from './shared'
import expressJwt, { UnauthorizedError } from 'express-jwt'

//... Inside bootstrap() function

 app.use( // NEW
    expressJwt({
      secret: jwtSecretKey,
      algorithms: ['HS256'],
      credentialsRequired: false
    })
  )

// ...

const server = new ApolloServer({
    schema,
    context: async ({ req, res }): Promise<AppContext> => {
      const user = req.user || null // NEW
    if (!req.body.query.trim().startsWith('query IntrospectionQuery')) {
        if (req.body.operationName !== 'login') {
          if (!user)
            throw new UnauthorizedError('Invalid_token', {
              message: 'Unauthorized : Invalid or Expired JWT Token provided !'
            })
        }
      }
      return {
        req,
        res,
        db,
        user // NEW
      }
    }
  })
The middleware added to Express will get the token from the Authorization header, decode it, and add it to the request object as req.user. It’s a common practice to add decoded tokens to Apollo Server’s context because the context object is conveniently available in every resolver and it’s recreated with every request.
To avoid even the login mutation that allows the user to get a JWT, the code below has been added to not throw an error if there is no req.user . This way, the login mutation can be called each time needed with corresponding credentials and return a valid accessToken.
if (!req.body.query.trim().startsWith('query IntrospectionQuery')) {
        if (req.body.operationName !== 'login') {
          // ...
        }
      }
Now if you query the server with an INVALID or NO TOKEN in the Header section of the request, you will have the following

And if you provide a valid token following the pattern Authorization: Bearer accessToken, you will get a response.

And that's it. Your server is now up and running with JWT well configured ✅
Thanks for reading, the source code is available here.
Follow me on social media to stay up to date with latest posts.


