Hey guys 🤚, Glad to have you here! In this post we are going to cover how to configure github actions with docker to deploy a Node.js backend.
To complete this post, you need to have to have:
- A Github account
- A AWS account
- A Heroku account
- Basics knowledge of Node.js and Javascript
- Basic Understanding of Docker
We will divide this post in 4 parts.
- Part 1 : Create a basic NestJS backend, create and configure Github Actions and Amazon ECR to deploy a docker image of our NestJS backend
- Part 2 : Update the Github Actions workflow to pull image from Amazon ECR and deploy it to Heroku
1. Our tools
Some key concepts we are going to cover here in this post:
- CI/CD: those two expressions stands for Continuous integration (CI) and continuous delivery (CD). They represents a coding philosophy and set of practices that drive development teams to frequently implement and deliver small code changes and check them in to a version control repository.
- Github Actions: according to https://resources.github.com/, GitHub Actions gives developers the ability to automate their workflows across issues, pull requests, and more—plus native CI/CD functionality
- Heroku: Heroku is a cloud application platform that makes it easy to both develop and deploy web applications in a variety of languages.
- Docker : is an open source platform for building, deploying, and managing containerized applications.
- NestJS : is a progressive Node.js framework for building efficient, reliable and scalable server-side applications
- Amazon ECR: Amazon Elastic Container Registry (Amazon ECR) is an Amazon Web Service (AWS) product that stores, manages and deploys Docker images, which are managed clusters of Amazon EC2 instances
With this brief introduction our the main tools we are going to use, let's start.
1. Create a NestJS Application
to start working with the Nestjs framework, we need to install the Nestjs CLI. Open your favorite terminal and run the following command
npm install -g @nestjs/cliThis will install NestJS cli globally. Now we can creaate a new NestJS project. run the following command on the terminal
nest new nestjs-docker-herokuThe new command initialise a new nestjs project with the given name. After running this command, nest will ask you wich package manager you want to use. You can choose npm or yarn i'm going to use Yarn . If you have an error while installing depencies with yarn, run the following command npm i -g yarn and then retry the nest new xxx command.
At the end o the install process, you will see the following message
🚀  Successfully created project nestjs-docker-heroku
👉  Get started with the following commands:

$ cd nestjs-docker-heroku
$ yarn run start
The basic setup of our nestJS project expose a unique endpoint / which display an Hello World! message at http://localhost:3000

Now we have a basic NestJS backend. Let's consider our backend only expose this basic endpoint. Let's create a github repository.
2. Prepare a Github Repo
Create a git repository here and link to the newly created project. If you don't have a github account, sign up here.
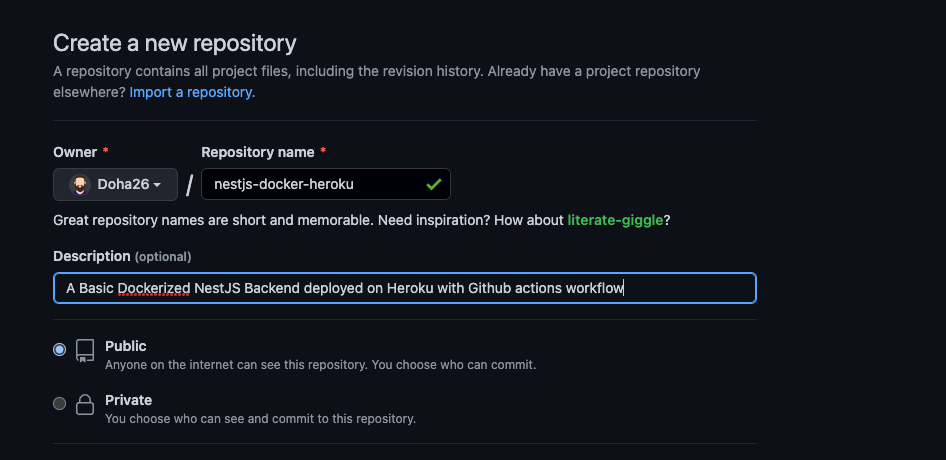
Go to github and get the repository url. We will set this url as the github url origin of our newly created nestJS project.
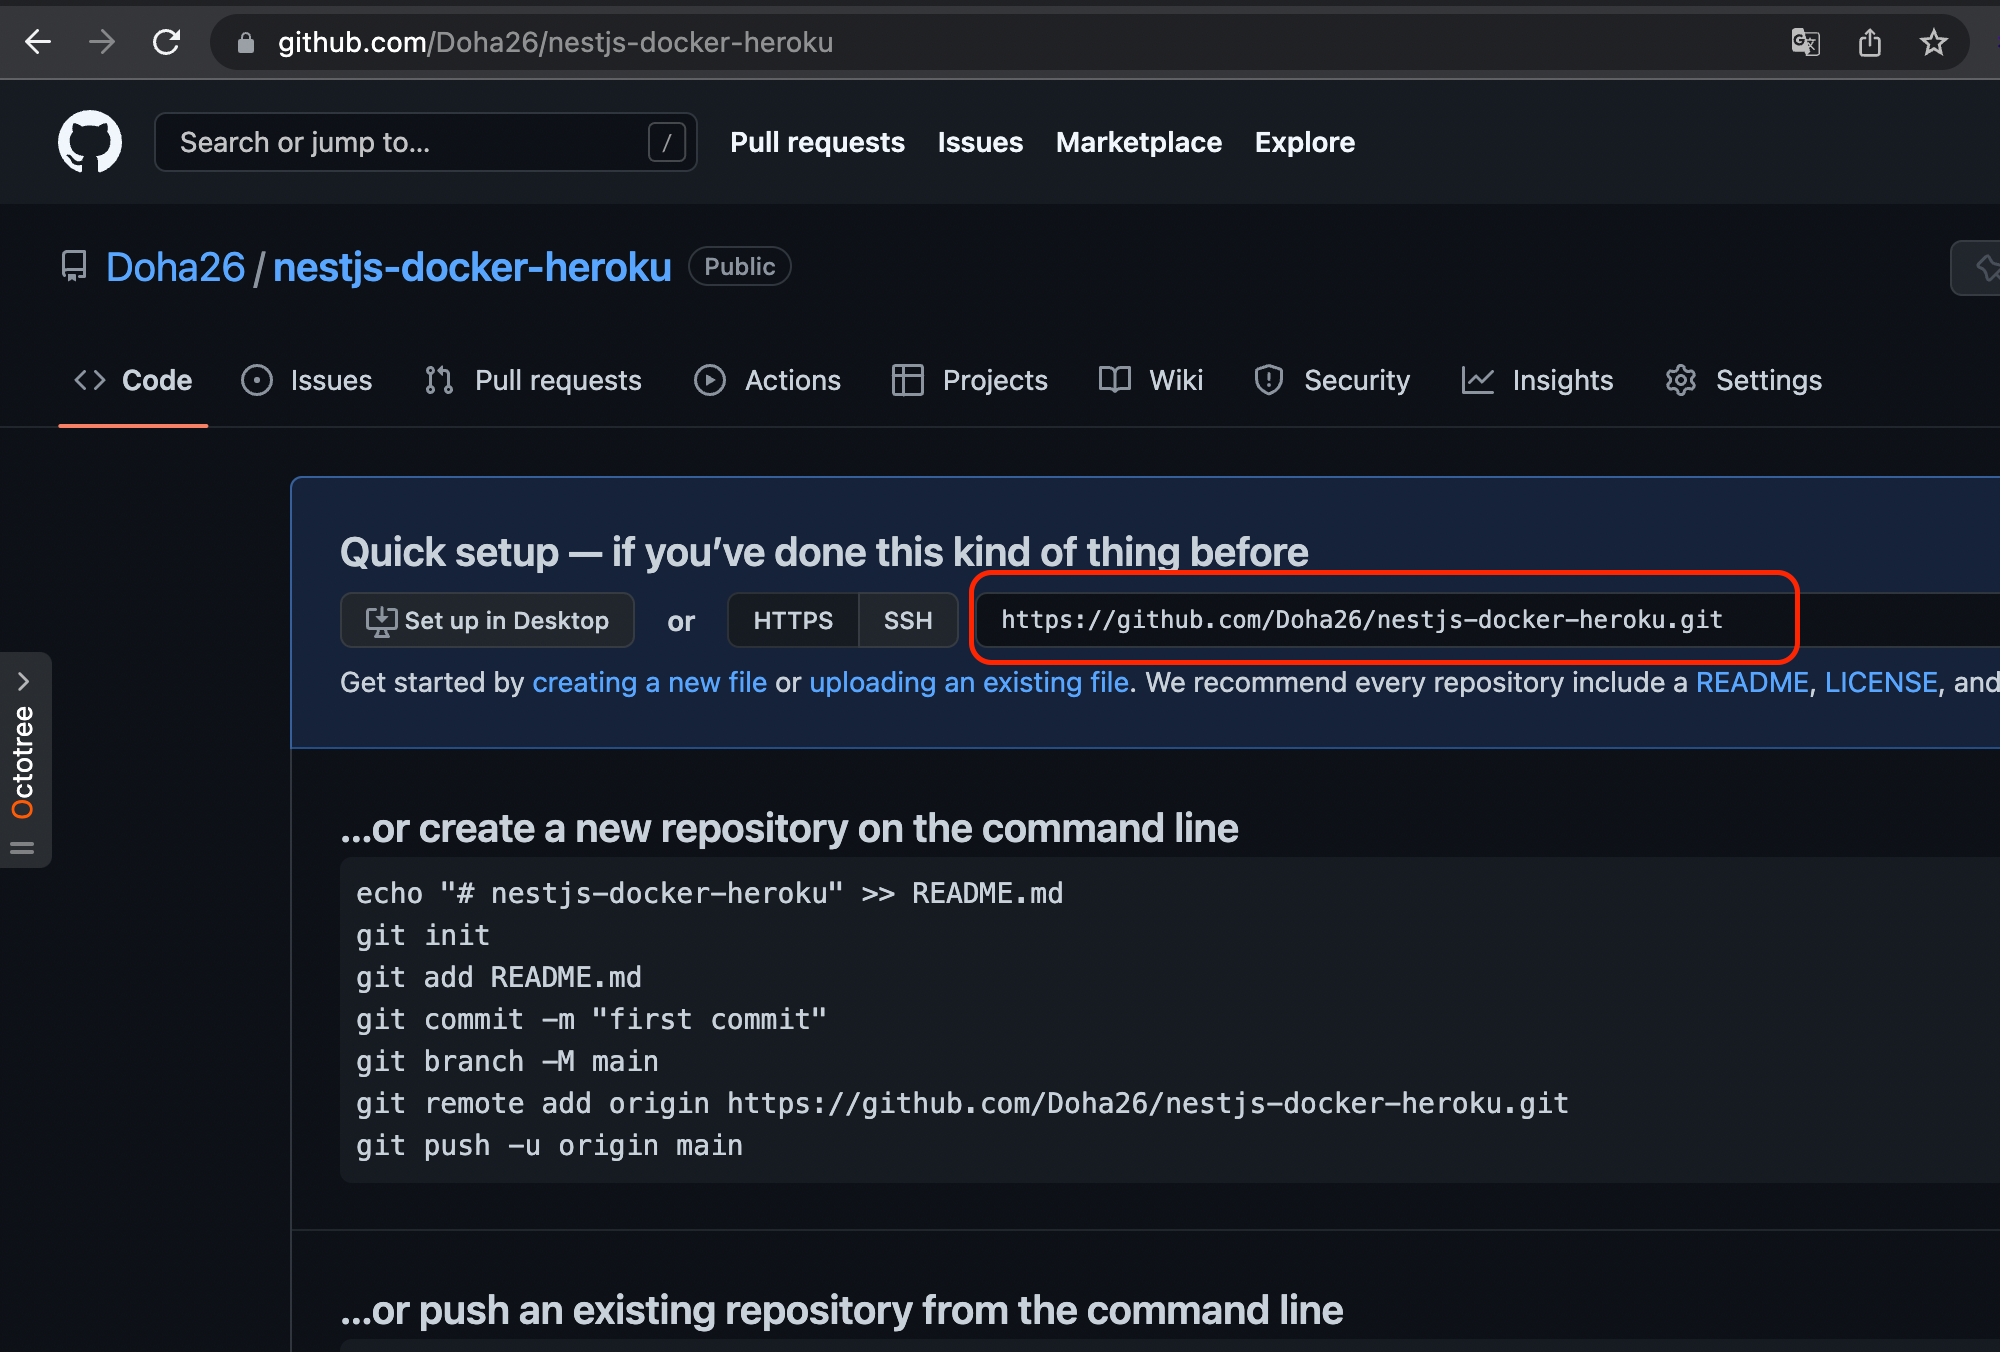
Copy the repository url and go to the root of your project to run the following.
git remote add origin https://github.com/Doha26/nestjs-docker-heroku.gitAdd all our project files to version control and push it to the github repo. To do this, run the following:
git add . // To stage all files
git commit -am "initial setup" // commit our filesgit push -u origin master // Push everything to github3. Create a Docker file for the NestJS app
Now that we have our Back-End API app up and running, let's containerize it using Docker.
Start by creating a Dockerfile named Dockerfile file in the project's root directory with the following content:
FROM node:lts-alpine as build

WORKDIR /usr/src/app

COPY package.json yarn.lock ./

RUN yarn

COPY . .

# Build
RUN yarn build

### Build production image

FROM node:lts-alpine as prod

WORKDIR /usr/src/app

COPY --from=build /usr/src/app/dist ./dist
COPY --from=build /usr/src/app/package.json ./
COPY --from=build /usr/src/app/yarn.lock ./

EXPOSE 3000

RUN yarn install --frozen-lockfile --production

CMD ["node", "dist/main"]
In this single Docker file, we create an image from existing Node image node:lts-alpine that will be pulled from docker hub.
Test the docker image locally
We can build and run our docker container locally to see if it works as expected. Open the command line and run the following at the root of the project.
docker build -t nestjs-docker-heroku .Once this complete successfully, run it in detached mode with the following command and bind the port 3000 of our container to port 4000 on our localhost
docker run -d -p4000:3000 nestjs-docker-herokuIf you open you go to http://localhost:4000 you will see the message Hello World! that is displayed when you access the /route.
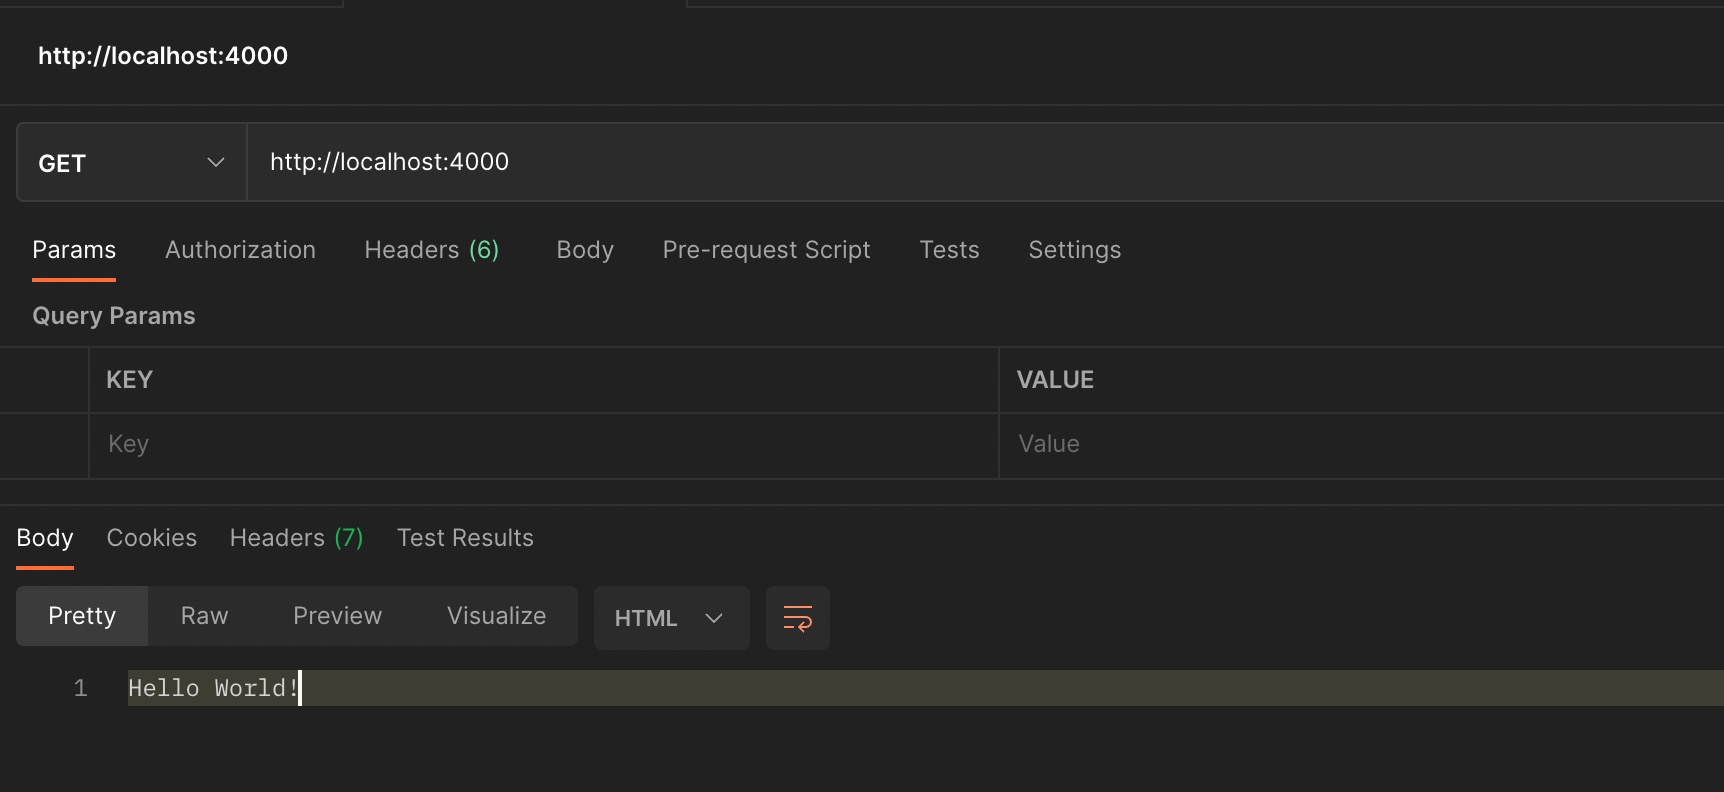
With all this set, let's go to the next step.
5. Configuring Amazon ECR
Go to AWS Management console and login. Once connected, search for ECR in the search area and then choose Elastic Container Registry. On the next screen choose private and then set a repository name in the given input as follow
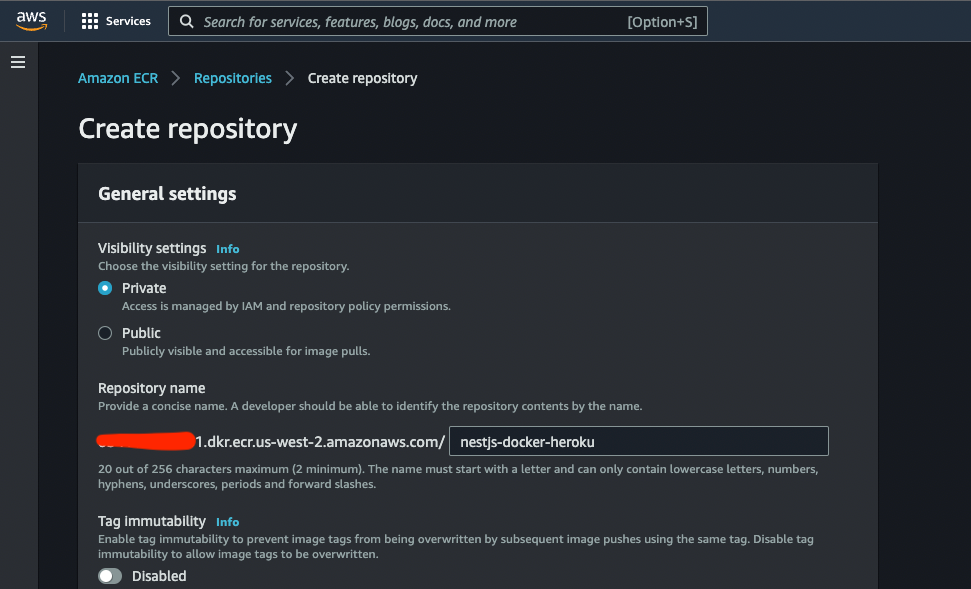
Note ☝️ : We used the same name nestjs-docker-heroku that we use for ECR_REPOSITORY in our workflow file main.yml
Once created, we have our repository created

AWS Region
An important point to note is the AWS region where the repository is hosted. if we take a look at the repository URI we have the following. xxxxxxxx.dkr.ecr.us-west-2.amazonaws.com/nestjs-docker-heroku. In this URI the AWS Region is us-west-2. You can see it on your management console next to your Account name on the top menu bar.

We will use this same region in our Github Actions workflow file.
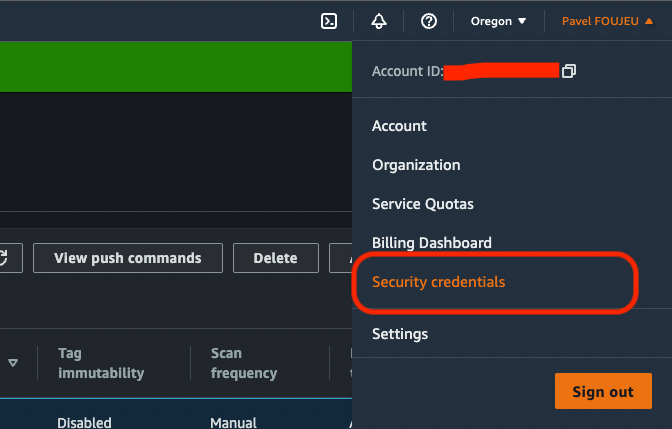
Since we have to deploy the docker image to ECR. So, we have to reference some AWS secrets in the GitHub Actions workflow. These secrets are AWS_ACCESS_KEY_ID and AWS_SECRET_ACCESS_KEY and they should be present in “repository secrets”. To do so, go to your AWS Account, click on your name at the top right then choose Security credentials.
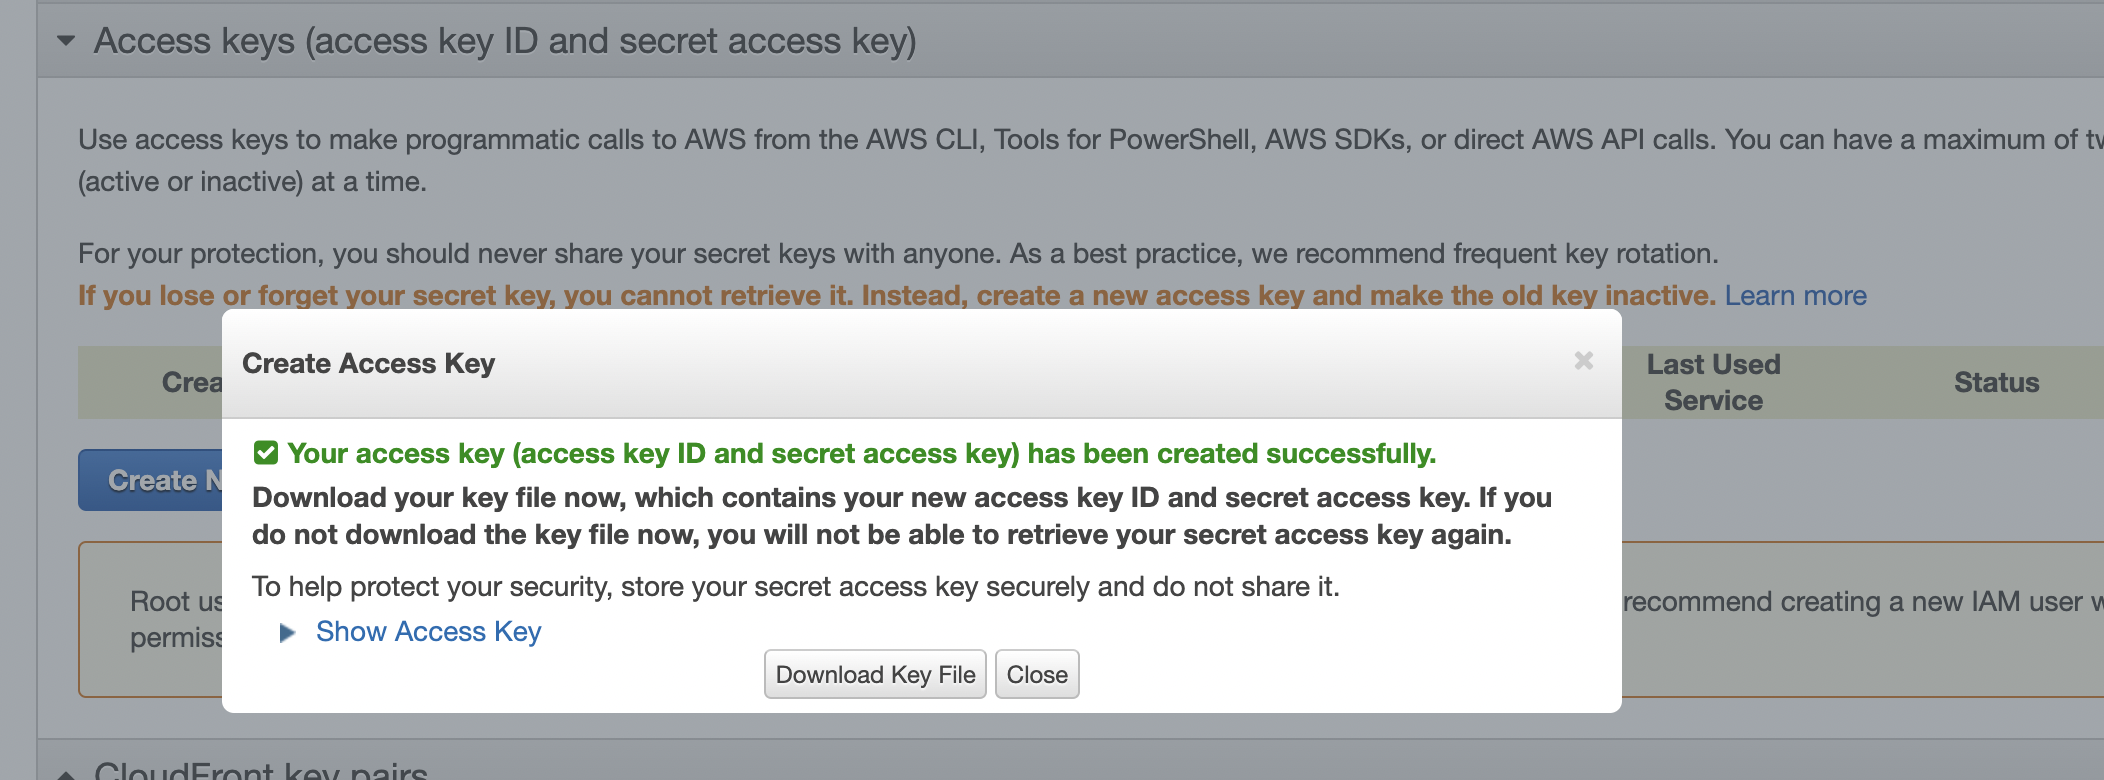
On the screen that appear, click on Access keys (access key ID and secret access key) dropdown and click on Create new Access key , a popup will open and here, click on Show Access key and you will see both keys.
5. Configuring Github Actions
Github actions as described previously is a tool that will provide us with configurable workflow that will host Jobs that will be executed concurrently as well as sequentially every time we push some code changes on the master branch of our repository. A job A job is a set of steps in a workflow that execute on the same runner. Each step is either a shell script that will be executed, or an action that will be run. For our use case, our jobs will do the following :
- Use the Dockerfile of our NestJS app to build a Docker image and push it to AWS ECR, An Amazon Container Registry.
- Pull the image from AWS ECR to deploy it to Heroku
Workflow in GitHub Actions
- A Workflow is a process that consists of one or multiple jobs.
- Workflow gets triggered by an event or manually.
- An event is a specific activity in a repository that triggers a workflow run. E.g- When someone creates a pull request or pushes a commit to a repository.
- Workflows use a YAML syntax and are present in the .github/workflows directory in your repository.
Creating a Workflow
Let’s create a workflow to deploy the docker image to the ECR repository. Go to your Github repository and click on the Actions menu. In the page that appear, click on set up a workflow yourself ->
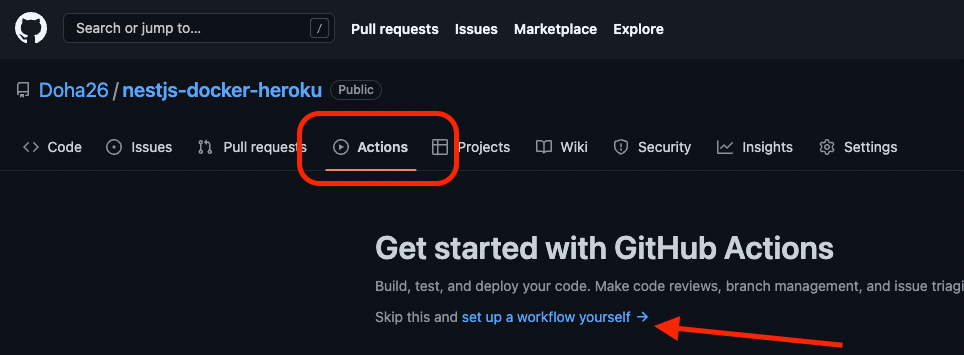
You will see the following

Keep the default settings and click start commit to commit the file with the default main.yml name. The workfow file is not added to your repository. With this changes on the remote repository, we need to sync it with your local repository. Make a git pull to fetch remotes changes on your local repository. Now on your project root folder your will be able to see a .github folder with a main.yml inside. We are going to update this main.yml with the following
name: NestJS-Backend:CI

on:
  push:
    branches: ['master']

jobs:
  build:
    name: 'Build Image'
    runs-on: ubuntu-latest

    steps:
      - name: Checkout
        uses: actions/checkout@v3

      - name: Configure AWS Credentials
        uses: aws-actions/configure-aws-credentials@v1
        with:
          aws-access-key-id: ${{ secrets.AWS_ACCESS_KEY_ID }}
          aws-secret-access-key: ${{ secrets.AWS_SECRET_ACCESS_KEY }}
          aws-region: us-west-2

      - name: Login to Amazon ECR
        id: login-ecr
        uses: aws-actions/amazon-ecr-login@v1

      - name: Build, tag, and push image to Amazon ECR
        env:
          ECR_REGISTRY: ${{ steps.login-ecr.outputs.registry }}
          ECR_REPOSITORY: ${{secrets.ECR_REPOSITORY}}
          IMAGE_TAG: ${{github.sha}}
        run: |
          docker build -t $ECR_REGISTRY/$ECR_REPOSITORY:$IMAGE_TAG .
          docker push $ECR_REGISTRY/$ECR_REPOSITORY:$IMAGE_TAG

      - name: Logout to Amazon ECR
        if: always()
        run: docker logout ${{steps.login-ecr.outputs.registry}}
Let's explain the content of this file.
nameThis is just the name of our Actionon push branches masterthe action will be triggered each time with push on branch master or when a pull request is created to be merged on masterenvSome environment variable the workflow will use to run jobs.jobs | build | runs-onthis tell the workflow to create a Ubuntu remote environment to run and build the imageChekoutLog in to the Remote Machine via SSH using the pre-written workflow by Official GitHub Actions i.e Checkout. It simply checks out our GitHub repository forDockerfileto build the docker imageConfigure AWS CredentialsSetting up AWS CLI/SDK on Remote Host and Configuring AWS Login Credentials and Assuming Roles using the pre-written workflow by Official AWS Teams i.e Configure AWS Credentials. For accessing the AWS ECR we need to define a custom Role in later steps.Login to Amazon ECRUse AWS/CLI Sdk to login to Amazon ECRBuild, tag, and push image to Amazon ECRBuilding the Docker Image by using the Dockerfile at the root of the repository, Tagging the Image with a version, and Pushing it to an Elastic Container Registry (Private ECR)Logout to Amazon ECRthis logout to Amazon ECR once the image is pushed successfully
To Understand the GitHub Actions syntax please refer to this link.With all this set, let's go to AWS Management console to create an AWS ECR repository.
Setting AWS Secrets
In the previous section , we have seen how to get AWS_ACCESS_KEY_ID and AWS_SECRET_ACCESS_KEY, now we need to provide this key for our Github Actions workflow. Go to Github Settings, then Secrets, and then New repository secret.
- AWS_ACCESS_KEY_ID — The AWS Access Key ID
- AWS_SECRET_ACCESS_KEY — The AWS Secret Access Key
- ECR_REPOSITORY — The name of the AWS ECR repository you created

Once we have all this set, let's push our local changes including Dockerfile, main.yml and .dockerignore on our repository to trigger Github actions jobs. Stage all changes and push to github. You will see a new Workflow in Github Actions tab.

And if you click on the workflow, you will see workflow jobs that are running
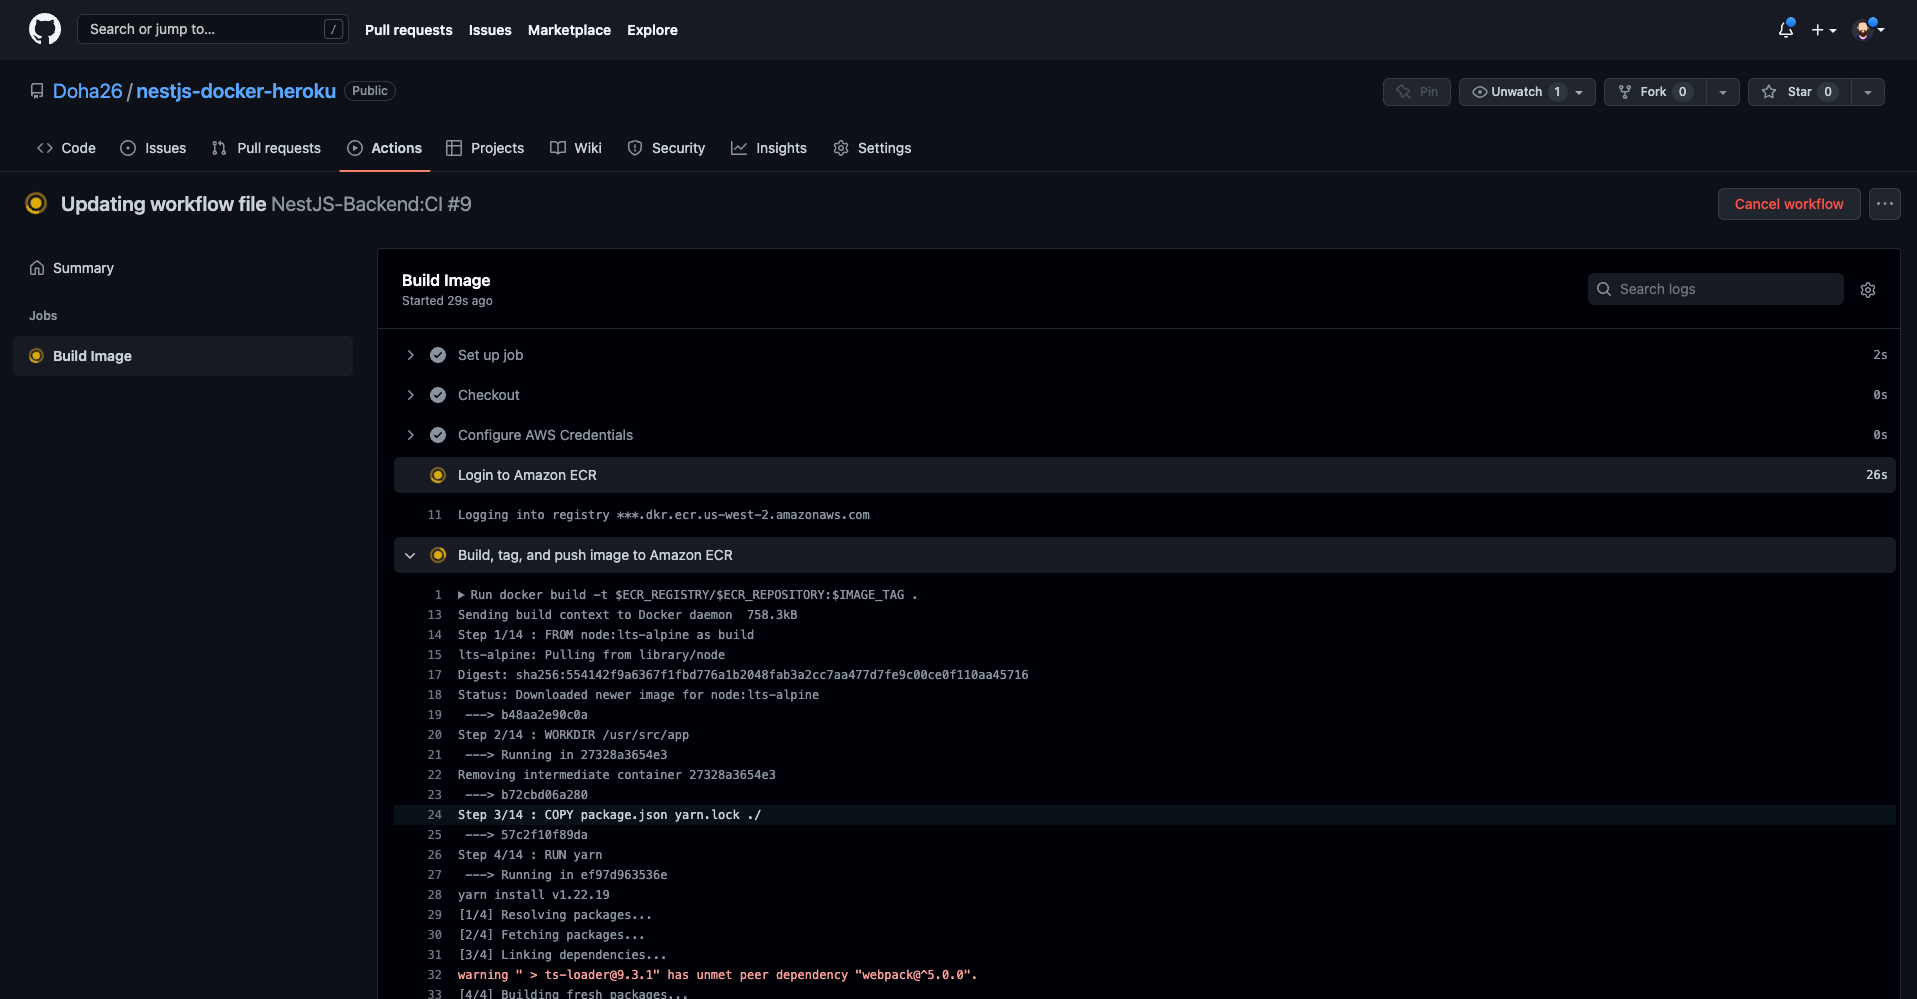
After everything complete, you will see the following output
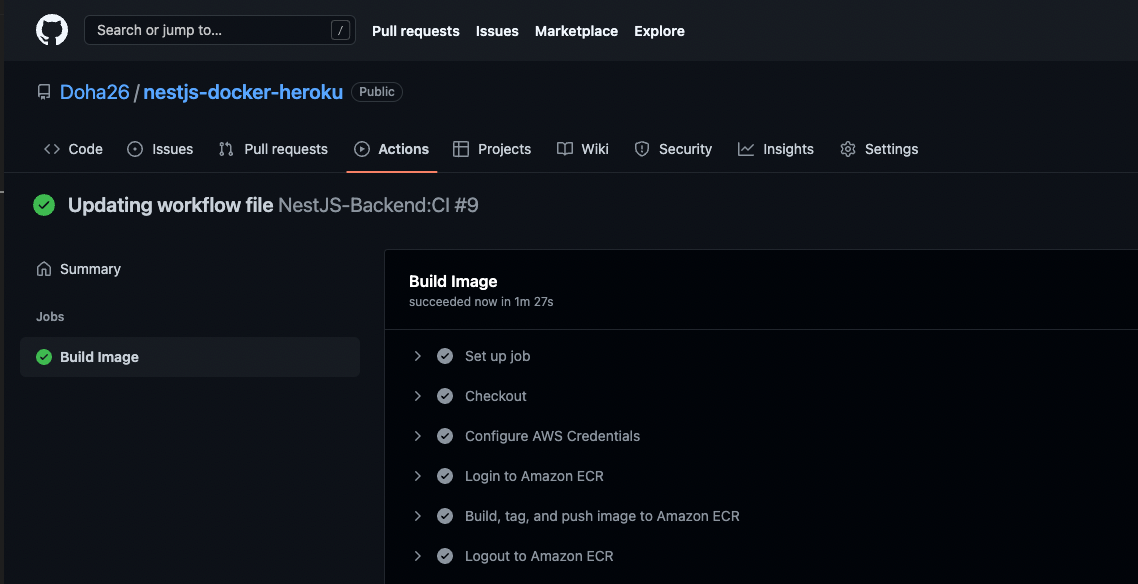
Great! Our docker image is now hosted on AWS ECR. That's the end of this first part, in the part, we will see how to update our workflow file to pull and deploy this image on Heroku.
Thanks for reading. The source code is available here
Follow me on socials media to stay up to date with latest posts.


